Flying an Airliner: For Dummies
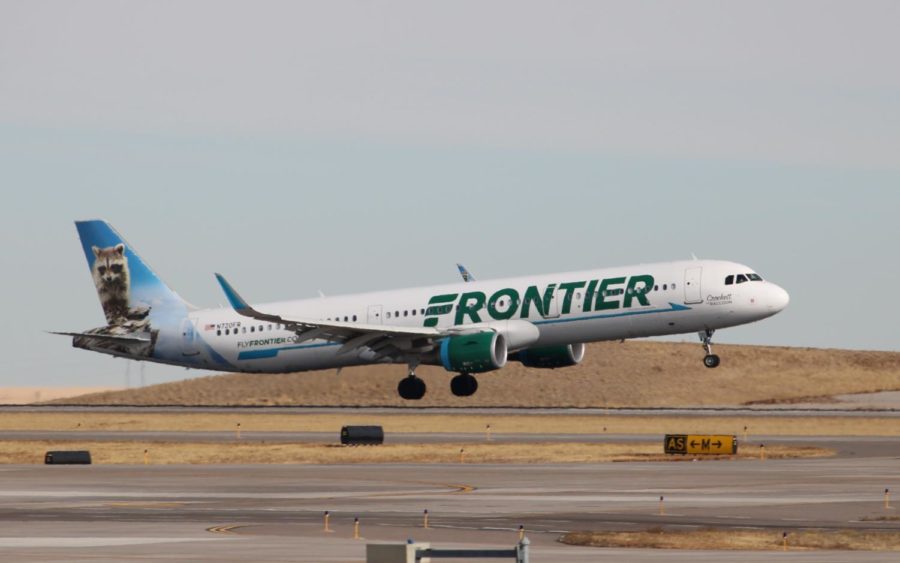
A plane from the world’s greatest airline takes off at DIA.
May 16, 2023
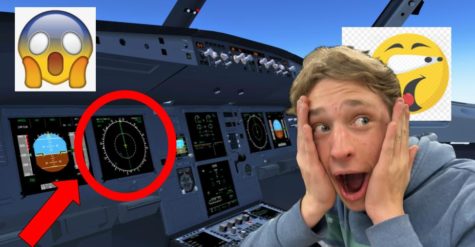
So, you’ve just bought Microsoft Flight Simulator and endured the twenty-hour 200 GB download. You’re excited to see the incredible graphics and fly your aircraft around the world, only to find out that you have no clue how to take off. While the disappointment may be immeasurable, and your day may be ruined, fear not. After spending the entire pandemic teaching myself how to fly in a flight simulator while simultaneously failing online school, I can help you reach your goal of aimlessly flying around doing scientifically impossible barrel rolls in a 747.
How Flying Works
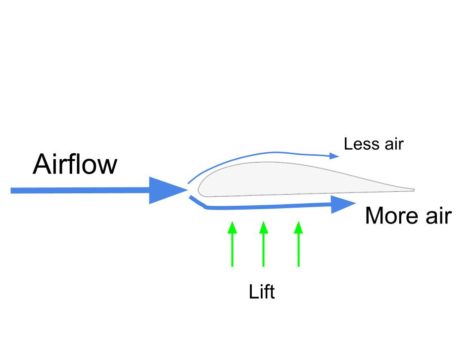
To be a competent pilot, one must understand how a plane actually flies. Contrary to popular belief, the phenomenon of flight doesn’t come down to magic, but instead simple physics and geometry. The real “magic” that keeps airplanes flying is the shape of the wings. The asymmetrical design of the leading edge of the wing splits airflow, pushing more air below the wing. More air leads to more pressure under the wing, keeping the aircraft airborne.
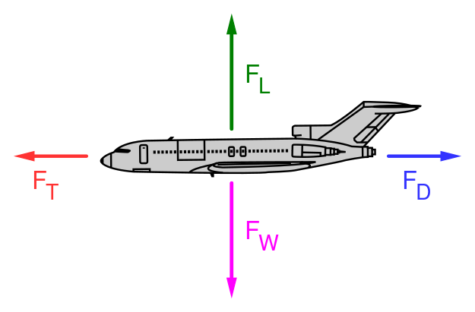
However, pilots need to be able to control the aircraft, which means manipulating airflow. Flight control involves harnessing the power of the 4 forces of flight: lift, weight, drag, and thrust. When all are equal, the aircraft maintains a constant speed and altitude. A change in the proportions of the values will cause the aircraft to respond to the change accordingly. For example, to slow a plane down, a pilot can increase drag and/or decrease thrust. Manipulating lift and weight will affect the aircraft’s altitude.
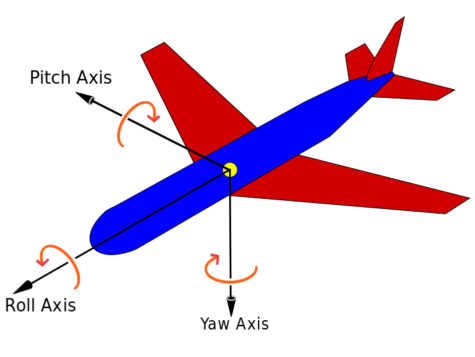
But how do you channel your inner airbender and actually “modify” these values? The wing shape alone just keeps the plane in the air, so this is where control surfaces come in. Control surfaces affect the plane’s orientation (or attitude), allowing the aircraft to respond accordingly to a pilot’s commands. Pilots can change the attitude of an aircraft in three ways: pitch, roll, and yaw. Each control surface controls each direction.
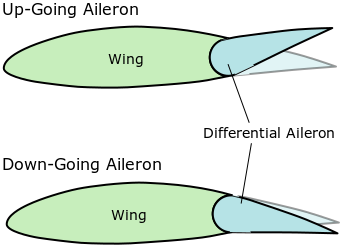
Located on the main wings are the ailerons. These control the aircraft’s roll angle by deflecting air in different directions, causing lift to increase on one wing and decrease on the other.
On the horizontal stabilizers (the two mini wings on the back of the plane) are the elevators. You will find that these elevators are quite ineffective at transporting people to different floors (I cannot condone trying this as you may damage the aircraft and/or yourself.) This kind of elevator moves to deflect air up or down, changing the aircraft’s pitch.
And on the vertical stabilizer (the tailfin) is the rudder, which deflects air sideways, causing the aircraft to “spin” on the x-axis.

Pilots move these control surfaces with the yoke, which is basically the “steering wheel” of the plane. Moving the elevators involves pushing the yoke forward to pitch down, and pulling it back to pitch upward. Rotating the yoke sideways causes the plane to roll in the corresponding direction. Yaw however, does not involve the yoke, but pedals on the floor.
Flying the Plane
Now, this information is fairly useless if you are stuck on the ground because your airplane doesn’t have an “on” button that you can press. You must know how the various aircraft systems work to get the engines running. Because procedures vary massively between different types of aircraft, the following steps primarily apply to modern commercial airliners and jets (specifically those made by Boeing and Airbus).
Starting the Engines
To start a plane, you first need power. The APU can solve this problem. The APU (Auxiliary Power Unit) is essentially a generator inside the tail cone that produces electricity while the engines aren’t running. To do anything with a plane, you must first turn on the main battery, then turn the APU on. Now you are basically in accessory mode. If you desire a realistic experience, you can input flight and performance data to program the route to your destination. But that part is boring, complicated, and technically not essential if you just want to fly around aimlessly. So, we’ll just skip to the part where you start the engines.
Before starting the engines, turn on your beacon, nav, and wing lights so the ground crew knows that you are starting and preferably avoid being sucked into the engine. If you are at a gate, you will need to call a pushback tug to push you onto a safe taxiway; otherwise you will roll straight into the building when you start, angering both the FAA (Federal Aviation Administration) and everyone waiting for their already delayed flight.
Once you are on a taxiway facing away from the building and any ground crew personnel, you can prepare to start. Most of the things you need are on the overhead panel. As a general rule, if you have no clue what you are doing, start by just pressing everything that is lit up with an indicator light and you’ll probably be fine. But because this isn’t always the case, I’ll go through specific steps in case you miss something.
First you need to get the fuel flowing. Turning on all of the fuel pumps will solve this problem. Next, find a button or switch that says “APU bleed” or something similar and turn it on, so that air from the APU can be directed to the engine starter motors. Make sure you turn on all the hydraulics systems as well. If done correctly, you should be ready to start.

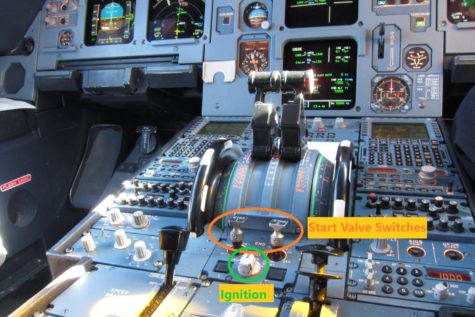
The actual engine start process can vary depending on the aircraft. But most aircraft have start valve switches behind the throttle on the center console. These must be switched up. On Boeing aircraft, there will usually be two dials on the overhead panel, labeled with “engine start” or “ignition.” While on an Airbus model, the ignition will usually be right behind the throttles near the start valve switches. If the engines do not start, check the screen above the center console. In the top-right corner, there will most likely be a message displaying why the engine cannot start. Follow the message(s) and turn on or off the systems described to clear the messages and start the engines. You should start them one at a time to reduce the risk of a failure, but the order doesn’t matter. It should take between 30 seconds and a minute for the engines to fully start up. Once started you can turn off the APU because the engines are now generating sufficient electricity.
Taking Off
Usually, pilots take off on designated runways. But before taxiing, you must make preparations. The order of these steps doesn’t really matter, but should be followed to perform an ideal takeoff. Find the ground spoilers lever on the left side of the throttles and move it to the armed position, which will assist the plane in coming to a stop in case you abort the takeoff for some reason. Next, on the right side of the throttles, move the flaps to an appropriate angle. The optimal angle usually depends on a number of factors, such as weight, wind speed/direction, airport altitude etc. On a Boeing aircraft, 10-15° should suffice, and on an Airbus, flap position 1 is standard.
You are now ready to taxi to a runway. If possible, it is best to pick a runway that faces the direction the wind is coming from. A headwind will help the aircraft takeoff sooner by providing more airflow over the wings. As you line up on the runway, turn on the landing lights (they are for takeoffs too) and push the throttles to about 80 percent thrust.
There are three speeds you should pay attention to during the takeoff: V1, VR, and V2. When you reach V1, you can no longer (safely) abort your takeoff. At VR, you can begin to pitch the plane upward at about three degrees per second. At V2, you can safely remain climbing even if your engine suddenly fails. After V2, when you have a positive and controllable climb rate, you can retract the landing gear and flaps. The aircraft’s computer calculates these speeds using data input by the pilots before departure. Because you probably skipped this, you can just estimate VR and pitch upward when you are rolling fast enough. You are now flying in the air. You may proceed to disregard all FAA regulations and pretend it’s Top Gun while flying a commercial aircraft.
Landing
Landing usually comes down to skill and experience rather than procedure. To land, just put down the landing gear, fully extend the flaps, arm the spoilers and set the autobrake. Air Traffic Control prefers you land on a runway, but this can be a challenge for some. In this case, landing in an empty field or a body of water will be easiest, but one should only attempt this in an emergency situation. Landing on a runway with a headwind is optimal, as the extra airflow keeps the plane airborne at lower speeds. As you approach the runway, aim to touch down on or near the solid white rectangles. Just before touchdown, about 30 feet from the ground, bring the throttles to idle and slowly pitch the aircraft up so the main landing gear touches the ground first. This is called a “landing flare.” After the main landing gear and the nose wheel contact the ground, deploy reverse thrust by bringing the levers on the front side of the throttles toward you. Once you are going slow enough, leave the runway via a taxiway exit so other aircraft can land behind you.

Congratulations! You have completed a flight. If done correctly, your aircraft should be (mostly) intact, and your passengers dissatisfied but alive. While I have skipped over many technical aspects that make a flight fully realistic, you can now at least “fly” the aircraft to a basic degree.
*Disclaimer: Royal Banner is not responsible for any incidents following this very informative article. This article is a result of the author’s acquired knowledge and experience, meaning that not every concept may be fully comprehensive. The information in this article is primarily applicable in flight simulators or other personal uses and should NOT be used in place of official instruction when flying a real aircraft.